NSW Railway Signal Diagram Photos
[Display as: Thumbnails
Order by: Year]
| Adamstown | 1984 | Adamstown diagram, the Belmont line can be seen to the lower left. |
| Ariah Park | 2004 | The track diagram mounted above the lever frame. |
| Armidale | 1999 | A closer view of the yard diagram at the station. |
| Barmedman | 2009 | The track diagram inside the staff hut. |
| Berowra | 2001 | The local panel at Berowra station. |
| Berrima Junction | 1980 | Berrima Junction diagram in 1980. |
| Berrima Junction | 2004 | The train indicator diagram at the junction between the main line and the branch to the Berrima Cement Works. |
| Berry | 1985 | Berry frame and diagram in 1985. |
| Bethungra | 1980 | Bethungra Signal Box track diagram in 1980. Now all that remains is an emergency crossover and a few rusted tracks. |
| Binalong | 1980 | Binalong diagram. |
| Binnaway | 1996 | A close-up of the signal diagram. |
| Boggabri | 1999 | A view of the yard diagram. |
| Bomen | 1980 | Bomen Signal Box diagram in 1980 shows the Meat Works Siding which was well used at that time. |
| Bondi Junction | 2001 | The local panel at Bondi Junction station. |
| Boorowa | 1980 | The diagram on the A lever frame, at the down end of the platform. |
| Bowning | 1980 | The block instruments at Bowning flank the track indictor board; the closest one is for Yass Jct. |
| Bowning | 1980 | A 1980 picture of Bowning diagram was of the old style. The drawing date was July 26th, 1943. |
| Bowral | 1980 | Bowral diagram in 1980. |
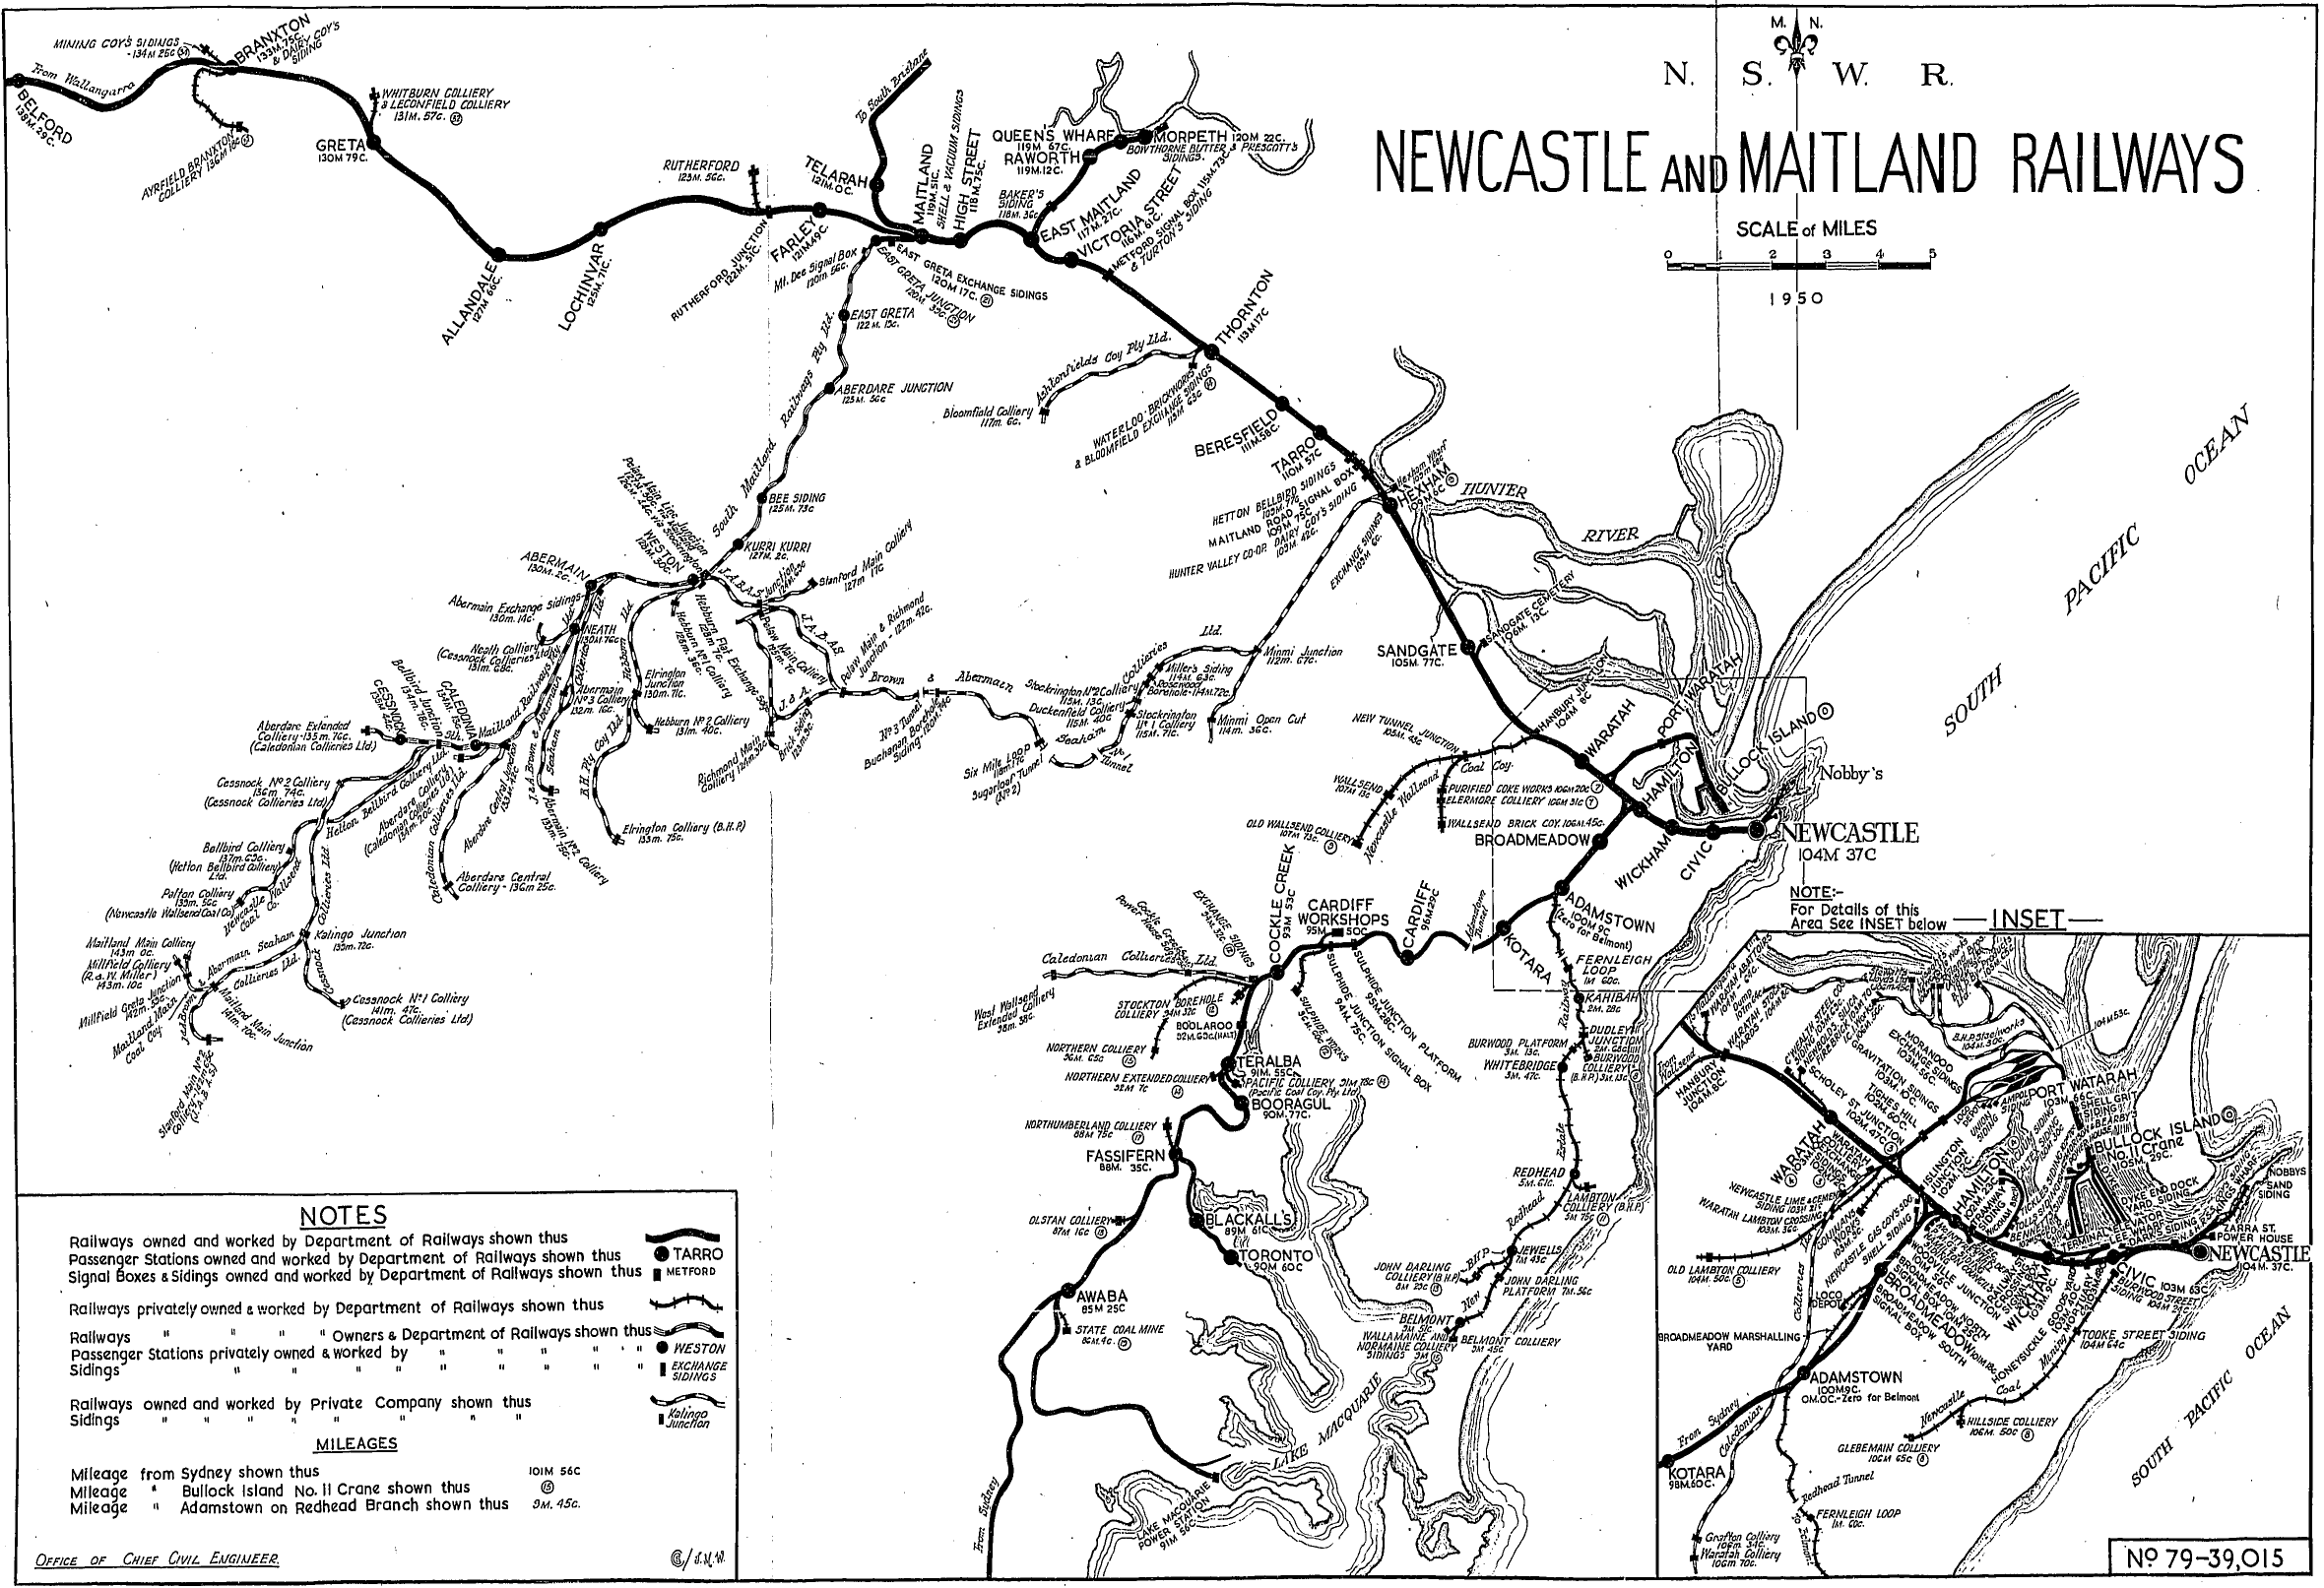
| Broadmeadow | 1979 | The left hand side of the signal diagram in the Broadmeadow Signal Box. |
| Broadmeadow | 1979 | The right hand side of the signal diagram in the Broadmeadow Signal Box. |
| Broadmeadow | 1986 | Broadmeadow North Diagram. |
| Broadmeadow | 1986 | A close up of Broadmeadow North Diagram . |
| Bulli | 2004 | The yard diagram for Bulli station. This is not the original board. Apparently the original board was stolen one night and the thief left a photograph of the original board and the Museum has reproduced this board from the photo. |
| Bulli | 2004 | The yard diagram for the coal sidings. |
| Bundanoon | 2004 | A closer view of the station diagram. |
| Bundanoon | 2004 | The station diagram and safeworking instrument behind the lever frame. |
| Bungendore | 1986 | Bungendore track diagram. |
| Caledonia | 1986 | The rather basic signal diagram. |
| Camellia | 1981 | The line diagram in the Camellia Signal Box. The branch at the top is the short Sandown line. |
| Canberra | 1985 | Canberra Frame A diagram in 1985. |
| Canowindra | 2001 | The Canowindra yard diagram. |
| Canowindra | 2001 | The yard diagram and lever frame. |
| Canowindra | 2005 | A closer view of the track-diagram board. |
| Central | 1970 | The signal diagram for the Wells Street signal box. |
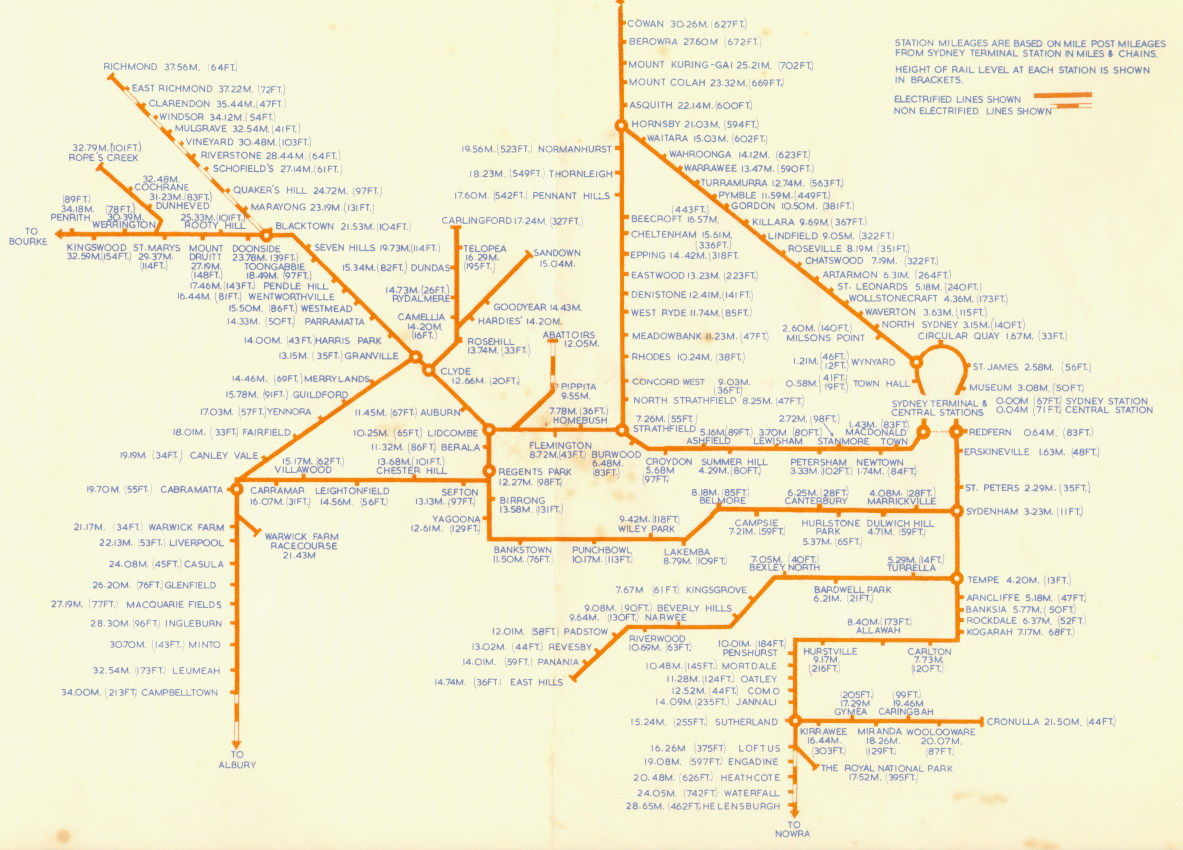
| Central | 1978 | One of the diagrams in Sydney West signal box. This one shows platforms 1 - 4, the main long distance and inter-state platforms. |
| Central | 2000 | A view of the yard control panel showing the country platforms. |
| Chatswood | 2004 | A close-up of the track diagram. |
| Clandulla | 1981 | Clandulla diagram in 1981; it may look old but was revised in 1973. |
| Clarendon | 1981 | Clarendon station diagram. |
| Coolac | 2003 | The signal diagram for Coolac has been preserved and is now in the Gundagai Railway Station. |
| Coonabarabran | 2000 | A set of points levers and associated diagram. Much of the diagram has been blacked out, as the yard was rationalised. |
| Coopernook | 1981 | Coopernook signal box diagram in 1981. |
| Cootamundra | 1980 | This is the entire Cootamundra North diagram in 1980. |
| Cootamundra | 1980 | The right half of the Cootamundra North diagram. |
| Cootamundra | 1980 | The left half of the Cootamundra North diagram. |
| Cootamundra | 1980 | The left half of the Cootamundra South Box diagram. |
| Cootamundra | 1980 | The right half of the Cootamundra South Box diagram. |
| Cootamundra West | 1980 | The small diagram for Frame D situated to the west of the platform, to control the main line to the siding. |
| Cootamundra West | 1980 | The diagram of Cootamundra West in 1980. |
| Cronulla | 2003 | The station master's desk and signal diagram. |
| Crooble | 2001 | The fairly simple yard diagram in the staff hut. |
| Culcairn | 1980 | Culcairn Signal Box diagram in 1980. |
| Curlewis | 2003 | The yard diagram adjacent to the outdoor lever frame. |
| Demondrille | 1980 | The diagram at Demondrille North Box. It almost appears the Blayney line was the main. |
| Dubbo | 1998 | The lever frame and signal diagram inside Dubbo West box. |
| Dubbo | 2004 | The Pacific National goods yard track diagram sign, adjacent to Darling St. |
| East Hills | 1985 | East Hills was the terminus for many years and this shows the Signal Box diagram depicting the simple layout of the station which was single line to this point. The location became quite busy in rush hours. |
| Emerald Hill | 2005 | The yard diagram, situated in the Staff Hut. |
| Emerald Hill | 1999 | A view of the yard diagram inside the signal boz. |
| Excelsior | 1981 | Excelsior had a staff & ticket location as shown in this 1981 picture. |
| Fassifern | 2004 | The train indicator diagram at Fassifern. |
| Fassifern | 2004 | The control panel at Fassifern, controlling the branch to the nearby Newstan Colliery. |
| Flemington | 1982 | Flemington Car Sidings signal box shows the array of pistol grips to control the complex sidings and main line. |
| Flemington Goods Junction | 1984 | The west end of Flemington Goods Junction diagram showing the connection leading to Lidcombe and the roads to the Goods line. |
| Flemington Goods Junction | 1984 | The east end of the Flemington Goods Junction diagram showing the lines to Pippita and eventually Abattoirs and connection to the back of the Car Sidings. |
| Flemington Goods Junction | 1984 | Flemington Goods Junction diagram. |
| Flemington Goods Junction | 1984 | The extensive Pistol Grip frame of Flemington Goods Junction in 1984. |
| Flemington Goods Junction | 1984 | This is the black Indicator board of Flemington Goods Junction which shows the positions of the train. Not to many of this style existed on the NSWGR. |
| Flemington Goods Junction | 1984 | A close up view of the now gone Pippita station are of the diagram in Flemington Goods Junction, with the various industries at the time it was a hive of activity. |
| Forbes | 2000 | The lever frame and track diagram are still present at the station. |
| Galong | 1980 | Galong diagram. |
| Gap | 2001 | The safeworking instructions at the junction at Gap. |
| Gerogery | 1980 | The track diagram inside Gerogery Signal Box showing a very simple layout. |
| Gilgandra | 2004 | The yard diagram. The station and goods shed are no longer present. |
| Glenbrook | 2000 | A close-up view of the track indicator panel at Glenbrook. |
| Glencoe | 2005 | The Glencoe yard diagram is now located at the Leuralla Toy and Rail Museum in Leura. |
| Gloucester | 1982 | Gloucester diagram showing a number of lines taken out in this 1982 picture. |
| Goobang Junction | 2007 | The weathered diagram at the junction of the Broken Hill and the line to Narromine. |
| Goulburn | 1979 | Goulburn North signal box diagram in 1979 showing the junction to the Crookwell line. |
| Goulburn | 1979 | Goulburn South signal box diagram in 1979 |
| Gravesend | 2004 | A close-up view of the yard diagram. |
| Gular | 2004 | The yard diagram. The passenger platform is no longer present. |
| Gunnedah | 2001 | The 6-lever frame and yard diagram on the platform at Gunnedah. |
| Gunnedah | 2001 | A close-up of the yard diagram. |
| Gunning | 1980 | The Gunning signal diagram. |
| Harden | 1980 | This is the diagram of Harden North Signal Box drawn in 1943. |
| Harden | 1980 | The diagram of Harden South Box shows the sidings. |
| Harden | 2003 | A signalling diagram of the section between Bowning and Harden. |
| Harden | 2003 | The train indicator diagram in Harden North signal box. |
| Harden | 2003 | The train indicator diagram in Harden South signal box. |
| Harefield | 1980 | Harefield boasted a Kellogg key panel in 1980. Most of the time it was "switched out" so the signals were on automatic. |
| Henty | 1980 | Henty Diagram showing the various frames through the yard and to the left is Frame D which controlled the branch to and from Rand to the mainline. |
| Henty | 1980 | Henty Frame D diagram showing the layout of the branch to and from the main line. |
| Illabo | 1980 | Illabo track diagram in 1980. |
| Islington Junction | 2005 | The indicator diagram in the signal box. |
| Islington Junction | 2005 | The diagram in the signal box. The Main North line enters from the top left and leaves on the far right. |
| Jct (Sandgate) | 1982 | Sandgate Cemetery Junction frame and diagram on the main line. |
| Jerrawa | 1980 | Jerrawa signal diagram. |
| Johns River | 1981 | The station diagram in the signal box. |
| Kootingal | 1999 | The yard diagram at lever frame on the platform. |
| Lawson | 2004 | A close-up of the signal diagram. |
| Lidcombe | 2000 | A view of the interior of the old Lidcombe signal box, including the train indicator diagram. |
| Liverpool | 2001 | The diagram inside the signal box at Liverpool. |
| Lockhart | 1980 | The A Frame with diagram at Lockhart, with the lever H just in front of it. |
| Lue | 1985 | Lue track diagram in 1985, a year before closure. The levers were painted to avoid rusting in the unattended box. |
| Lysaghts | 1986 | The diagram at Allan's Creek Signal Box was rather complicated being surrounded by the network of tracks from Lysaght's and Australian Iron and Steel. |
| Lysaghts | 1985 | A closer view of the signal box diagram. |
| Lysaghts | 1985 | A closer view of the signal box diagram. |
| Maldon | 1989 | The shunter's diagram near the entrance to the cement works sidings. |
| Martin Place | 2001 | The local panel at Martin Place station. |
| Marulan | 1980 | Marulan Signal Box diagram. |
| Medway Junction | 1980 | Medway Junction diagram. |
| Melinga | 1981 | Melinga diagram in 1981 showing the refuge loop gone, as shown by the white out. |
| Merah North | 1998 | The yard diagram at Merah North. |
| Mindaribba | 2003 | The local control panel at Mindaribba. |
| Minimbah | 2004 | The local control panel at Minimbah. |
| Mittagong Junction | 1980 | Mittagong Junction diagram in 1980. |
| Molong | unknown | The signal diagram inside the signal box. |
| Moree | 2007 | The Yard Diagram hanging up in the Staff Hut above the frame. |
| Morisset | 2005 | The signal diagram inside the signal box. |
| Morisset | 2005 | The signal diagram for the nearby branch to the Vales Point power station. |
| Mudgee | 1981 | The yard diagram. |
| Mulgrave | 1984 | The station diagram. |
| Murrurundi | 2003 | The control panel inside the signal box. |
| Murrurundi | 1983 | Murrurundi diagram in 1983. |
| Narrabri Junction Platform | 1975 | A close-up of the diagram above A Frame, located on the platform. |
| Nevertire | 2002 | A close-up of the signal diagram located at the A frame. |
| Newbridge | 2003 | The local control panel at Newbridge. |
| Newcastle | 2007 | The track diagram and minature lever panel inside the signal box. |
| Newcastle | 1985 | The Newcastle diagram in 1985 which still has the arrival and departure roads to the car sidings shown as they were still in use. Subsequent years have seen the lengthening of the platform and removal of the Market St. gates. |
| Newnes Junction | 2005 | A closer view of the signal diagram. The balloon loop serving Clarence Clliery is visible at the left. |
| Oaklands | 1980 | The diagram for the dual-gauge yard. Solid lines are standard (NSW) gauge, the hollow lines are broad gauge (Victoria) and the dashed lines are dual (third rail) gauge. |
| Oatley | 2004 | The indicator diagram at Oatley station. |
| Orange | 2003 | The diagram inside the signal box at Orange. |
| Otford | 2004 | The signal diagram and safeworking instruments inside the preserved signal box now at Albion Park. |
| Parramatta Road Crossing | 2001 | A more modern version of the control panel inside the signal box. |
| Penrith | 2001 | A view of the signaller's control desk at Penrith. |
| Penrose | 1980 | Penrose Signal Box diagram. |
| Petersham | 1988 | One of the oldest examples of a pneumatic signal box was Petersham. Although little used for many years it was opened for emergency working and sidings, there was also a frame B. The diagram shows its age. |
| Picton | 2004 | The yard diagram at Picton. |
| Picton | 2004 | The train indicator diagram and lever frame at Picton signal box. |
| Port Kembla | 1987 | The diagram inside Port Kembla signal box. The diagram shows the balloon loop and nearby siding entrances. The box used a rotary switch panel. |
| Port Kembla North | 1987 | Port Kembla Sidings North diagram. |
| Queanbeyan | 1986 | The signal box diagram. At the far right, the lines to Bombala and Canberra diverge. |
| Queanbeyan | 2003 | The signal diagram for F Frame. |
| Queanbeyan | 2003 | The signal box diagram in 2003. The up dock siding and associated crossovers have been excised from the diagram. |
| Quipolly | 1998 | The local control panel at Quipolly. |
| Razorback | 1980 | The A lever frame, diagram and signal telephone at the up end of this dead end siding. |
| Razorback | 1980 | Razorback diagram sits on a raised platform with the frame in the middle of nowhere. |
| Redfern | 2001 | A view of the indicator panel serving platform 12. |
| Rhodes | 2001 | A view of the emergency panel at Rhodes. |
| Richmond | 1984 | The Richmond yard diagram, showing the turntable, engine shed and goods shed. The curved line above the platform is all that remains of the former line to Kurrajong. |
| Richmond | 2001 | The signal control board at Richmond. |
| Riverstone | 2005 | A photo of another photo, showing the Diagram of Riverstone with the sidings to the Meatworks, Cattleyards and Goods sidings. |
| Riverstone | 2005 | A photo of a photo, showing the board with lights that hung above the levers inside the Riverstone Signal Box in 1989. |
| Riverstone | 2005 | The current signalling board inside the Riverstone Box. It now sits on a desk where the old levers used to be. |
| Robertson | 2007 | Inside the Roberston control room showing the control panel. The loop and points at Roberston are normally controlled from Wollongong but this panel can be used to take control if necessary. |
| Ropes Creek | 1998 | The signal diagram at Ropes Creek. Note that the section from St Marys to near Ropes Creek was electrically signalled, and from there on was mechanical signalling. |
| Ropes Creek | unknown | Ropes Creek Diagram that was mounted above the Track Indicator Board. |
| Ropes Creek | unknown | Ropes Creek diagram and indicator board. |
| Roto | 1982 | The 8-lever frame in the signal box. |
| Scarborough | 1986 | Scarborough diagram showing very little changes over the years. |
| Sefton Park South Junction | 2004 | The diagram and points levers inside Sefton Park Junction signal box. |
| Spring Ridge | 1998 | The location diagram inside the signal box. |
| Springwood | 2005 | The signal box board in Springwood signal box. |
| Springwood | 2000 | The signaller's control desk at Springwood. |
| St Marys | 2001 | A view of the signaller's control desk at St Marys. Of note is that this is the point where the Main West reduces fro 4 tracks to 2. |
| Stockinbingal | 2003 | The diagram inside the signal box. |
| Sulphide Junction | 2005 | Part of the large control panel at Sulphide Junction. |
| Sulphide Junction | 2005 | Part of the large control panel at Sulphide Junction. |
| Table Top | 1980 | The simplistic Signal Box diagram at Table Top. |
| Tallong | 1980 | Tallong Signal Box diagram in 1980. |
| Tamworth | 2008 | A photo through the glass of the former signal-box on the platform, showing the diagram of the former track arrangement. There is now a single track at the station. The main line then follows its former path in the left of the diagram , although the siding at the loading dock of a factory dis-used due to a switch to road transport. |
| Tamworth | 1997 | The yard diagram at West Tamworth. The former branch to Barraba enters from the right bottom. |
| Tarago | 2004 | The yard diagram, located inside the signal box on the southern end of the platform. |
| Taree | 1987 | Taree North Diagram in 1987. |
| Taree | 1987 | Taree South diagram. |
| Taree | 1987 | Taree South diagram close up. |
| Telegraph Point | 1982 | The yard diagram. |
| Temora | 2003 | The Temora yard diagram. |
| The Rock | 1980 | Diagram in The Rock Signal Box shows how the station boasted an engine shed, turntable, stockyard are and of course this was the junction to the Oaklands Branch. |
| Thirroul | 1986 | Thirrould had a Frame B on the south side of the platforms, the diagram shows location and control parameters. |
| Togar | 1998 | The local panel at Togar signal box. |
| Towrang | 1980 | Towrang Signal Box diagram. |
| Ulan | 1999 | The signal control board at Ulan, controlling the entry and exit of trains from the Ulan Coal Loader balloon loop. |
| Ulan Loop | 2008 | The track indicator diagram in the staff hut at Ulan. |
| Uralla | 2005 | The yard diagram at Uralla. |
| Urana | 1980 | The diagram in the signal box. |
| Uranquinty | 1980 | Uranquinty Signal Box diagram. |
| Wagga Wagga | 1980 | Wagga diagram as it appeared in 1980, the Tumbarumba branch can be seen top left. |
| Wagga Wagga | 1980 | A close up view of Wagga's diagram showing the positions of the frames. |
| Warwick Farm Junction | 1983 | This tiny Box was only open on race days serving the branch to the racecourse. |
| Waterfall | 2001 | The signaller's control desk at Waterfall. |
| Werris Creek | 1996 | The signal diagram at the station. |
| Werris Creek | 2005 | A closer view of the new diagram inside the signal box. |
| Willow Tree | 2005 | The local control board for Willow Tree yard. You can see that the signals are at clear for an Up (right to left) train to come into the loop, while the bankers are sitting at the platform on the main (2 red LEDs on left). |
| Windsor | 1984 | Windsor's Signal Box diagram in 1984. |
| Wingello | 1980 | The diagram in Wingello box. |
| Wolli Creek | 1986 | The diagram in Wolli Creek Junction Signal Box showing the line to East Hills running behind the Box. |
| Wollongong | 2000 | The large signal control room at Wollongong. |
| Woodville Junction | 1986 | The diagram inside Woodville Junction Box. |
| Woodville Junction | 1986 | The diagram inside Woodville Junction Box. |
| Yass Junction | 1980 | The diagram for Yass Junction, the line to Yass Town can be seen at the lower left. |
| Yerrinbool | 1980 | Yerrinbool track diagram in 1980. |
| Yerrinbool | 1980 | Yerrinbool train locator board where the lights glow showing train progress, 1980. |